Archive for the ‘water works’ Category

Permaculture Site Plan: 1st Draft

I’ve been very busy these past few weeks: on any given sunny day, and on several slightly rainy ones, I could be found outside with my 100 ft tape measure, a stake and a mallet, and a sheaf of paper (sometimes wrapped in a clear plastic bag). I was using triangulation to create an accurate map of our property and the major features on it: driveway, house, shed, etc. It took me a few days to get all the measurements, and parts were tricky. In order to use triangulation to locate a specific object in space you must start with two known points that, together with the object, form a triangle. Our property is large and does not contain many two-point features, so often I had to work my way out to a desired object, by locating two trees I could use, or even by planting stakes in the ground.

The result of all this hard work (and a bit of fun with a compass and square-ruler that took me back to grade-school geometry class) was this:

This shows the complete North boundary (North is Up), and the east and west boundaries. The southern boundary is not shown, as it lies way down the page. What you see is approximately half the true length of our property. The Northern boundary lies some distance from our street, which runs west to east, ending at a dead end about halfway along the length of our northern boundary. East from there one enters the forest through a hiking trail. So while it looks as though the house is practically on the street edge, in fact we have a fair amount of yard that extends northwards past the true property boundary to the street.

The dotted lines show the Right of Way (ROW) for the local utility company. A pair of residential power lines runs through this corridor (the poles are not on our property) and there are restrictions on building within this area.

Our driveway begins in the northeast corner and wraps around the house so that the area marked by solid lines including the house, garage, and shed is all gravel save for the tear-drop shaped garden area in front of the deck. This area, enclosed by the solid lines, is flat, having been dug into a hillside. Thus the shaded area behind the garage and part of the house, which is a steep grade of earth that rises abruptly to the high point on our property – the northwest corner. Standing at the northwest corner of the garage the earth rises about 8 feet almost straight up, but quickly comes down as one walks southwards, so that at the site of the shed the land is only a couple of feet higher than the grade around the buildings.

The roadway that extends downwards from the main living area is, as of right now, dirt and rather loosely defined. It wanders southwards until, within the ROW it turns to the west and leads out of the property through a gate, and into the forest next door.

Using this map I was able to play with siting our future cob house. I cut out a square whose dimensions corresponded to 33 x 60 ‘ (2000 sq ft) and moved it around to see where it would fit. I wanted the parking area to be north of the house so that the southern views were not marred by cars, which also renders the south yard area quite unusable. I wanted to avoid doing any more grading and earth moving if possible (I hate the fact that they dug into the hillside in the first place: it looks like a wound on the earth having that great wall of earth rising up behind the buildings). And we could not have the building anywhere within the ROW. Since there is a neighbour to the east with a house close to the property boundary we wanted to avoid building along the east side. I eventually settled on a site for the future house, though mostly for the purposes of moving forward with the design process: I’m not certain this is where it will end up, but it gave us a starting place.

It then took some time and many false starts to finally come up with a plan for how to divide up the property into the various Zones of permaculture.

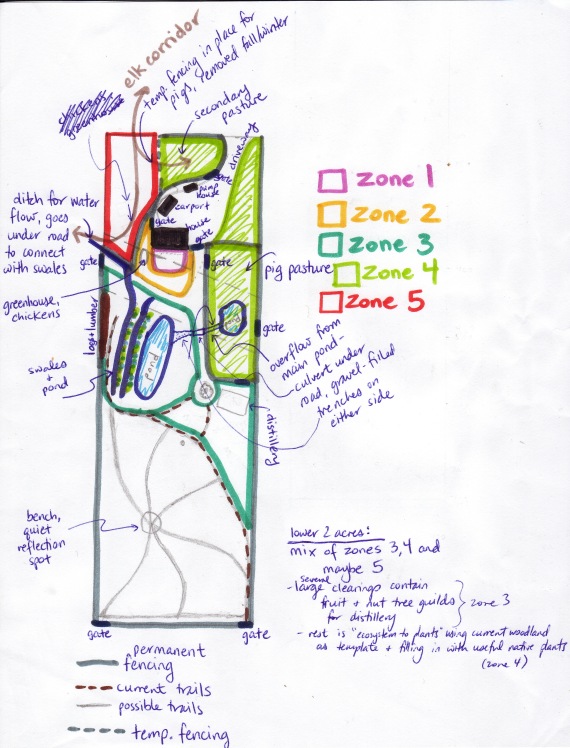
This map is almost the entire property; it should actually extend a bit further down but I decided not to be accurate there for the sake of having a manageable paper size. The living area shows the future house (largest black rectangle). Zone 1 is outlined in pink and will contain the kitchen garden, patio and other outdoor living areas. Zone 2 is outlined in yellow and will include more kitchen garden plants, including some dwarf fruit trees and berries, a greenhouse, chicken coop, greywater ponds, rainwater harvesting barrels and cisterns.

Zone 3 will contain most of our polyculture guilds: fruit and nut trees around which guilds are built. These will form our Food Forest. It also contains a spot for drying out logs and milled lumber (brown area on west side). Finally, this Zone contains our water harvesting system, which I’ll now describe in detail.

When it rains, a small stream forms that runs into our property through the West Gate. This is water that comes out of the forest and collects along the power line roadway (which forms a natural ditch that directs water onto our site). A substantial amount of water flows through here during the wet season and we wish to capture and store it and use it to our advantage. So the dark blue line starting at the West gate shows my idea for digging a proper ditch that would then have to run under the road (a simple culvert would do) to get to our Zone 3. This ditch would feed into a system of swales – ditches that run on contour, on the downward side of which are mounds of earth (berms) that are planted with polyculture guilds. The swales capture the water, spread it out over a long stretch, where it slowly sinks into the berms and irrigates the plantings on the berms. Each swale has an overflow area that feeds into the swale below. I’ve only drawn two swales here but probably we have room for 3 or more (this area slopes rather steeply to where I’ve drawn the larger pond). The final swale feeds into the pond. Right now this area is a seasonal “giant puddle” that is overgrown with salmonberry bushes. We’d like to dig it deeper and turn it into a true pond, create a wetland garden around it, and figure out how to make it less permeable so it holds the water year-round. This area will then be home to some geese and ducks, who will do double-duty providing eggs and meat as well as patrolling the food forest for slugs. There will be an overflow for the large pond – a gravel-filled trench, that will lead eastwards under the roadway (culvert) to a smaller, secondary pond. This is currently another seasonal “large puddle” where salmonberries abound. We may try to fix it so it is still wet when the pigs are here, providing them with a place to cool off. But the main source of water for the pigs will be a rainwater harvesting system on the distillery building.

The “roundabout”-looking thing in Zone 3 is a large bigleaf maple tree that sits atop a hill, near the centre. We plan to extend the dirt road and make it go around the tree. From this point southwards the property is all woodland. The brown dotted lines are current trails through the forest. The future Distillery building will go east of the maple tree; an area will be cleared to the south of the building to allow solar access, and within that part of Zone 3 will be more fruit and nut guilds with which my husband hopes to create some interesting spirits.

The light green areas are Zone 4, which can be divided into 3 sections. The first lies along the east side of the driveway and is currently full of trees and shrubs. We’re going to leave this as is for now, as it provides a nice privacy screen to the neighbour’s house. South of that area is a roughly 1/4 acre pasture which will house our pigs each spring/summer. We’re hoping there is enough land in there for them to graze without completely digging up the place, but if necessary we can divide it up into 2 or 3 sections and rotate them through it. The third section of Zone 4 is north of the house. This will be a reserve grazing area for the pigs should the other pasture not be sufficient in size to prevent them overgrazing it.

The grey lines show where we plan to install permanent fencing. The entire area from the house to at least the southern edge of Zone 3 will be perimeter fenced so that deer and elk cannot get into the food forests (I’ve shown it extending around the entire southern half of our property, but am no longer sure if we need to do that). However, I wanted to include in our plans a way for the local elk herd to continue visiting our property. It has been such a wonderful and meaningful experience to wake up to the sight of these gorgeous animals grazing so close to our house, and I wanted to include them in our design plan. So you’ll note that, in the northern section of Zone 4, the permanent fencing ends about halfway along the northern boundary as you approach from east to west. This is so we can leave it open when not in use by the pigs. The elk have been accessing the property through the northwest corner (which is forested) and grazing along the western strip of pasture, then leaving through the West Gate. So by leaving that part unfenced we retain their access. The bit of permanent fencing can easily be closed off by running a short length of temporary fencing (dotted grey lines) for when the pigs need to use it. Removing the temporary fence will open up that part to the elk when the pigs are not using it. Thus, the area in red denotes Zone 5: the wild, untouched zone.

This leaves the bottom 2 acres below Zone 3 to design. I scribbled some notes in there, but have since changed my mind. In wandering through the woodland this winter I’ve fallen in love with it again and am increasingly distressed at the thought of disturbing it much further. I’m hoping that the area already set aside for Zone 3 will provide enough fruit and nut trees to keep my husband happy. Then I could leave the rest as is, though I have some ideas to experiment with what is called “ecosystem to plants” design, basically starting with the current woodland as a template and adding or replacing certain other plants to increase ecosystem health, restore at-risk native species, or just experiment with new polyculture blends. I’ll talk more of this in a future post about my upcoming farm project, which involves this area. For now, I’m hoping to leave this area “as is” and see what we can do with it while preserving its unique beauty.

Well, if you’ve followed me thus far I hope I’ve kept you interested. The process of permaculture design is fascinating to me and I’ve really enjoyed the process so far.

Lessons from our first winter

Winter has arrived here on Vancouver Island. Even Vancouver got a dusting of snow, but around our place – which is about 300 feet above sea level – we got a nice big dump of snow. It’s rather unusual for this part of the country to get snow so early, and the temperatures have also been unseasonally cold. We’d been thinking about this for a while, how we would prepare and cope with winter in the country, but it all happened upon us rather unexpectedly and we’ve had a few hiccups already.

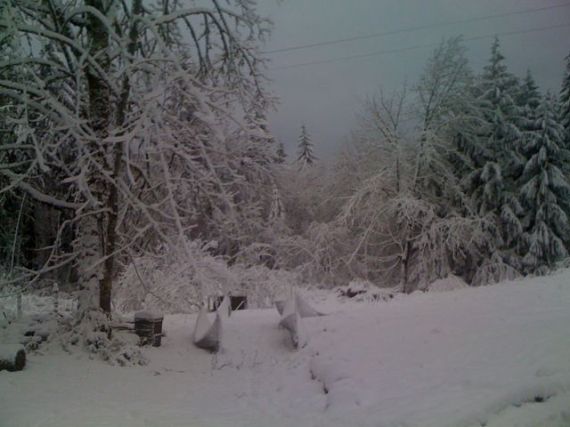
It all started rather blissfully. On Friday evening I went to bed with a dusting of snow already on the ground and we woke to a winter wonderland. the photo at the top is the view from our deck, which is pretty much the same view from our bedroom window. That morning I drank my usual cup of tea, but this time I was perched on the dresser staring out the window at the magic around us…I couldn’t get enough of how amazing it all looked, and counted my blessings for the umpteenth time since moving here.

But the blissful moment was interrupted by discovering that the pigs had escaped and were getting into the garbage cans. Husband and I put on our snow gear. After I dug it all out of storage and dusted off the cobwebs, that is. A mouse had built a cozy little nest in one of Daughter’s snow boots; note to self – don’t store boots in the garage! It was actually a very enjoyable task to go out and repair the electric fence around the pig paddock. Since they were due to leave us the next day we took the whole thing apart and rigged up a much smaller paddock that linked to the “livestock chute” Husband had fabricated from various materials (that’s it sinking under the snow in the foreground of the above photo). Then the kids got themselves bundled up and we searched the property for a suitable hill. It was very cool being able to toboggan on our own property! The dog was having a blast running around in the snow. Later we went inside and I made a yummy homemade soup and all was right with the winter world.

Things started going wrong the next day. As you may recall, the pigs were supposed to be long gone before this kind of weather hit and we couldn’t get another appointment until this past Sunday. That morning the processing guy called to say the livestock hauler couldn’t get his trailer to the processor’s facility so everybody was rescheduled for the following weekend. I’ve been worried about the pigs as they only have a 3-sided shelter and I honestly don’t know if they can handle this sort of cold. Some of the books say you should build a winter shelter for them, others say they are hardy and will handle a bit of cold (and this from a guy who lived in Virginia where the temps went down to minus 28 C!). So far they don’t show any signs of distress, but at this point there’s not much to do except keep them fed and watered and hope that next weekend’s appointment goes as planned. Meanwhile it’s about – 10 C here; thank goodness they have each other to snuggle up against.

Our big concern when thinking about the approaching winter was losing power. We were told by the neighbours that it’s a given, and we did experience several power outages in the summer though they all resolved themselves within minutes. The issue was heat since our propane-powered central heating (forced air) system relies on electricity to run the fan. We’d talked about getting a wood stove or a gas stove hooked up to our propane tank, but this place is so small and already crowded I just don’t know where we’d put it. Husband argued that, for the same price, we could get a kick-ass generator that would not only give us power for heat in case of an outage, but power for the stove and our computers, etc. Kind of hard to argue with that logic. Well yesterday in the midst of this cold-spell the heater breaks down. We still have power, but no heat (the fan motor has died). Hopefully tomorrow we’ll get someone out to fix it, but in the meantime it’s rather chilly in here! We’ve all got extra wool blankets on the beds, I’m bundled up and drinking hot tea, but this is not something I’ll want to go through regularly. I guess we’ll be shopping for generators this week (when everybody else is, too; oh the joys of being a procrastinator!).

On the water front, we assumed the pump house and well head were already weather-proofed as it’s not like nobody was living here before us. However it appears that the only thing keeping the pump from freezing was a light bulb in the pump house, which blew out back in the summer and never got replaced. So today we lost our water. Husband put a space heater in the pump house, which appeared to fix the problem for a while, but then later on we lost our water again. So looks like we’ll be calling a guy in tomorrow for that, too!

Of course all this happens while I’m out of town for two days with Daughter, and Husband is home with Son, both of whom are sick with colds. In true Kid Fashion, Son recovered almost immediately and has been bouncing off the walls while Husband has had to tend to an electric fence malfunction (the pigs rooted up the power line – that’s what happens when you move the paddock in deep snow and forget where the line is buried!), the pump issue, take apart the heater, and try to cook for himself and Son…On the way home from the ferry terminal I get a pleading text message asking us to bring pizza and lots of water. We have water for drinking and cooking now, but not for flushing the toilet – now who’s crazy for stocking up on family cloth, huh??

Amidst all the craziness I have to laugh and love it all. A bunch of suburbanites spending their first real winter out in the country – lots to learn! But we will learn and figure it out, and in the meantime it’s hard to complain with all that frozen beauty out there.

Hot Pigs

Summer has arrived in full force here and watering the pigs has become an issue. We’ve been using a large plastic bucket for water, but they usually knock it over. It’s a pain to refill it as you have to go into the pig paddock and fetch the bucket. The pigs think you are bringing food (that seems to be all they think about, really) and in their enthusiasm they knock into my legs and shove at me with their snouts, leaving smears of mud all over my legs. Fun.

Then I have to take the bucket back up to the driveway (where the end of the hose is), go turn on the one-and-only tap (which is right by the front door of the house and is too low to the ground to fit the bucket under), go back down the driveway and fill the bucket with the hose, then bring the bucket back to the pigs. They plunge their heads in there like they’d been desperately thirsty (which makes me feel guilty) and then, when they’ve quenched their thirst, they start rooting the edges of the bucket which eventually flips over. They then wallow in the mud – that part is actually quite fun to watch.

We knew that we would have to come up with a better solution for watering the pigs and the heat has made this a more pressing issue. Ideally we’d get something like this:

…although I’d prefer something that isn’t plastic. But we’re trying to be really frugal these days since summer vacations are looming. So we’ve been looking for a cheaper solution. The other day I was driving down the highway and passed the sign for a new thrift store I’ve been meaning to check out. I’d been feeling sorry for myself after reading Jenna’s post at No Name Farm about the thrift and salvage stores in her area. Here was a rare chance to browse the new store without kids in tow, so I swerved over to the exit and went on a treasure hunt. I came away with this for the pigs:

It cost me $15 and was in perfect condition. It even came with one of the sink strainer/stopper thingys. Now, in my experience those things often don’t make a watertight seal, so I headed over to Crappy Tire (a Canadian Institution!) and spent $5 on rubber sink plugs. I couldn’t wait to show it to the pigs and fill both side up with enough water to keep them well-hydrated and save me trips back and forth from the tap to the paddock all day.

They seemed to really like it, especially Sweet (the black one, female) who usually gets bullied out of the way until Sour (the brown one, male) has his fill:

…but I underestimated their curiosity and inherent destructiveness. Those snouts are not only damn strong but they are dexterous as well. When the pigs had had their fill of water they began to play in the sinks and within a minute had found the sink plugs, pulled them out, and tossed them around the paddock. Okay…on to Plan B.

I then decided to try the strainer that had come with the sink. I had one in my sink whose handle had come off. I figured this would not give the pigs anything to grasp with their teeth and so, on one side at least, they wouldn’t be able to pull it out. I was wrong. It lasted most of the day but by the evening feed I saw the sinks were empty and one strainer has gone missing. Sigh!

The next easiest solution is to use silicon caulking or some kind of epoxy to permanently install plugs in the drain. Or we could get some kind of cap to put on the underside of the drains. Either way it requires a trip to the hardware store and adds to the cost. Also, for cleaning purposes it would be nice to have a drain. Meanwhile, we’re back to lugging buckets of water back and forth throughout the day to make sure they stay hydrated.

I did score one other thing at the thrift store – this metal bucket with handle and lid. After two years of composting I’ll finally get to stop using up my mixing bowls and stealing pot lids to prevent the fruit flies from escaping. It cost me $2.99. I painted the word “compost” partly to decorate it (which didn’t really work since I’m not at all artistic) and partly so husband can distinguish between that and the bowl we put pig scraps in.

Toilet Talk

It’s important to practice water conservation even when you live in the City, but living in the country and having a well brings the issue right to the forefront. I’m much more aware of water usage here and our habits have changed in order to avoid wasting water. Summers are supposed to be dry here and we don’t know how our well will hold up once the wet season is over. One set of changed habits concerns using the toilet, and that’s what I’m going to talk about today.

We have old toilets with big tanks. Instead of replacing perfectly good toilets we’ve taken some steps to reduce our water usage considerably. I’ve adjusted the float balls to cut off the refill supply sooner. And as soon as I get my hand on a couple of bricks I’ll be placing them inside the toilet tanks to reduce the amount even further . But what really cuts down on water use for the toilets is sticking to the following guideline: If it’s Yellow, Let it Mellow; If it’s Brown, Flush it Down

We do flush in the morning after everyone has had their first pee of the day; it’s concentrated stuff then and has a strong odor. But for the rest of the day we do not flush if there is just urine in the bowl. None of us have noticed an unpleasant smell from doing this and it saves countless litres of water every day.

Of course, if you are going to follow this adage you need to do something about the toilet paper. After several people have peed and dropped paper in the toilet you may end up clogging the pipes when you finally go to flush. So, to aid us in our water saving efforts we have become fastidious about using our cloth wipes (we started using cloth wipes a while ago, but until we moved here it was a now-and-then thing).

This photo is the View From the Throne. Wipes are right in front of you, and the wet bag is hanging right above them. It’s hard to miss, and serves as a reminder to everybody in the family what we’re doing. So with no toilet paper in the bowl we can “let it mellow” for as long as need be without worrying about clogs when the time comes to flush.

Now some of you may be wondering about the how we handle “#2” (and some of you might be screaming “TMI!!!” right about now, too). We don’t use cloth wipes for that (after almost 5 years of rinsing cloth diapers in the toilet I am so done with that job!). Hubby uses good ol’ fashioned toilet paper; that’s his preference. And since we “flush it down when it’s brown” there’s no issue there. But the kids and I use flushable wipes. Except we don’t flush them…

I know, they are far more costly than toilet paper and really aren’t the least bit “green”. They are my guilty pleasure and I fully confess to this environmental Sin. Not only do they ensure that the kids do a proper job of wiping, but I personally find they do a better job and leave me feeling much cleaner than the dry stuff. I’m kind of addicted…to the point where, on the rare occasion when I travel without kids, I bring some along anyway.

But I can now argue that they are actually saving our septic system. Because we don’t flush them. We are not convinced that they are safe for septic tanks, even though the packaging says so (the first summer we had our trailer they clogged up the blackwater holding tank pretty bad and clearing that out was lesson enough for us!) so we put used ones in the waste bin. At first I thought this would make things rather smelly but after using them in our trailer this way I found that they actually didn’t smell the place up at all and the same has held true in our new place.

So, between using cloth wipes for pee and using wet wipes that go in the garbage we are putting very little toilet paper into our septic tank. And because we follow the advice to “Let it Mellow when Yellow” we are using far less water. They say that flushing the toilet uses more water than any other household use, so it’s an important area to begin thinking about water conservation.