Archive for the ‘working the land’ Category

Fall Gardening Project

Today was a lovely fall day. While the sky was clouded over, the sun did peek out every now and then, its diffuse winter-ish light a testament to our planet’s progress on its journey to the “far side” of the sun. The temperature was cool, but after feeding the pigs and chickens and moving the chicken tractor I soon tossed off my knit wool cap and vest. With those chores out of the way I was ready to tackle my fall gardening project. Today was the day I planned to get my garden in shape for winter, with a look ahead to spring.

Last year I just about broke my back digging raised beds out of our hard, rocky soil. I’d planned to green manure the beds but an early snowfall killed the small-seeded fava beans before they got a chance to germinate. I also hadn’t gotten my fence finished, so the various animals that parade through our field managed to compress the soil somewhat over winter. By spring I had sunken beds that needed intense chopping and hoeing to become suitable for planting. Despite these failures we did get some early salad greens and we’re still enjoying tomatoes, although I’m unsure how much longer they’ll be ripening. But some stuff just didn’t grow well, and the problem was shallow soil that was low in nutrients and organic matter. So my goal this time around is to build up the soil over winter so that I get deeper soil, beds that are actually higher than ground level, and a higher nutrient content in the soil. Sure, I could just go buy a truckload of topsoil, but I didn’t want to go that route. We don’t own a pickup truck, it’s expensive to buy topsoil, and I wouldn’t really know where the stuff had come from. I wanted to do it myself.

I had two strategies under consideration, and I ended up trying both of them today. First up was the Lasagna Garden. This is a way to build up a plantable garden over winter. Basically, you lay some kind of paper product (newspaper, cardboard, etc) on the ground in the shape of your garden-to-be. Then you make a “lasagna” by layering compostable materials, alternating between “green” (e.g. grass clippings, kitchen scraps) and “brown” (e.g. straw, hay, dried leaves) layers. The stuff rots down over winter to become humus-rich soil full of organic matter and perfect for spring planting.

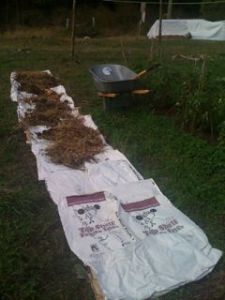
I started with the layer of paper products, in our case feed bags. I’d been saving these up and had a rather tall stack of them. They are made of two layers of heavy-duty paper, sewn shut with string, and contain only a small amount of glue along the bottom and top seams between the two layers. I decided not to be a purist; I don’t think the amount of glue is enough to contaminate my garden. And as I didn’t have enough cardboard or any newspaper around it seemed the smartest way to make use of something that would otherwise be tossed into the recycling box. I already had the outline of a bed – it was one I’d dug last year and didn’t use this year, so it was weedy and hard. A good candidate, I thought, for this “no-dig” garden method.

After bringing the pile of feed bags to the garden, I brought out my brand-new wheelbarrow (yikes, are these things expensive! but being the procrastinator I am, I simply didn’t have time to shop around for a used one; at least I know I’ll get lots of use out of it). I headed to the compost pile and rolled back the logs barring the bottom front, and took a good look at what I had. I’d started this pile over a year ago but I don’t seem to have much luck with compost. My first attempt at our last house resulted in a soppy, wet, yucky mess littered with eggshells. I hadn’t included enough brown matter. This time I seem to have erred in the other direction. I added straw whenever I dumped a bucket of kitchen scraps on the pile, and now I had a whole lot of brown matter but nothing that looked like soil. Still, I could clearly see some rotting food scraps in there.

To make matters more complicated, I’d dumped lots of weeds from the garden on the pile last month and I’m quite sure many of them were in seed. This is a no-no when using compost to build a garden bed. But I decided it would be much easier to just weed a lot next spring than to try and separate the stuff now (probably impossible, anyway). Not one to be easily deterred I filled up my wheelbarrow and began piling it on top of the feed bags. It wasn’t really a lasagna, since I only had two layers. But since my compost seemed to be a mixture of brown and green (okay, more brown but still…) I decided to just lay it on the paper and hope for the best.

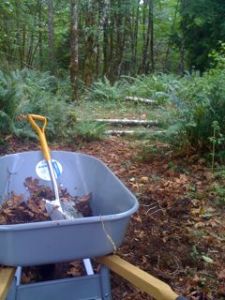
When I was done I realized that I was still missing an ingredient from the usual lasagna recipes: soil. I wasn’t sure how important this was, and looking around me I wondered where I would get soil from. Our field is so thickly planted with grass that you can’t put a shovel into it, and I didn’t want to tear up part of the field anyway. What lies around the edges isn’t thickly grown because the soil there is pretty crappy stuff and I couldn’t see how adding dusty, rocky, lifeless “soil” was going to help me build a garden bed. I knew the soil underneath my feed bags was in bad shape, so adding a top layer of soil would probably be a good thing. But I wasn’t about to go buy some. As I stared off into the distance I thought how silly it was to live on 4 acres and not have a ready source of soil, and then the answer hit me. I was staring at our woods! The ground in there is lovely humus, rich with leaves and bugs. If I scraped some of it off the walking paths I wouldn’t be depriving the forest itself of much, and I’d be clearing up some trails at the same time. So with my wheelbarrow and shovel I headed into our woods.

It was lovely work. The dirt smelled wonderful, and it came up with a nice layer of rotting leaves. It had the perfect texture and “tilth”, and I laughed to myself that I had discovered the perfect source of soil right here in our own woods – free for the taking! I only needed two wheelbarrows full (about 12 cu ft total) to cover up my garden bed. But that was enough for my back muscles anyways. And I got this in just one small patch of pathway. Not only did I solve today’s problem, but now I know I’ve got a wonderful source of humus for topping up beds when I plant next spring.

The finished bed looked pretty good, I thought:

Though I won’t be surprised if it breaks down so much that it’s not very high come spring. Still, it’s a start!

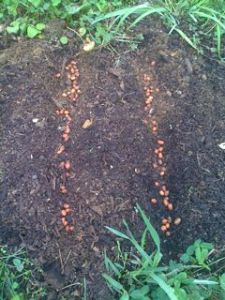
The other option I’d considered for building soil was trying the green manure thing again. Since I had used all my compost and feed bags on the one large bed, I decided I might as well try seeding the smaller beds. However, once again I improvised based on what I had on hand, not feeling like spending my Sunday-in-the-garden driving around to nurseries instead. I had a lot of small-seeded fava beans left over from last year, but they had been inoculated back then and sat in a plastic bag in the potting shed all year long. I figured it was a total crap shoot as to whether these things would germinate, but what the heck. Last year I’d sprinkled them on top of the soil, which I think was a mistake. This year I took the time to plant them in rows, gently covering them up with my hands. I used a pretty dense line of seeds assuming that I’d be lucky if half of them germinated. It was quick work and I enjoyed it very much.

And, just for the heck of it, I scattered some of them on top of my lasagna bed. It wouldn’t matter if they didn’t germinate, but if they did I’d have some extra organic matter to turn into it next spring before planting.

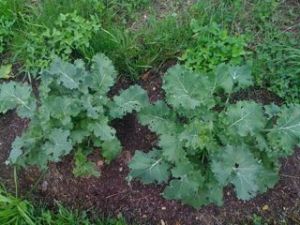
As I was doing this I discovered that my kale seemed to have come back to life in the last couple of weeks. I’d planted it in summer, really not the right time, and it looked small, sickly, and pale all that time. I’d given up on it when, to my surprise today, I discovered it had been revived by the cool wet weather. That was a nice bonus to an already lovely day of hard work. Looking forward to toasting up some kale chips soon!

We have Fences!

It was an exciting couple of days here this past week when the fencing guys showed up to install our new fencing. After going over many possibilities we decided to have professionals come and do the side of the pig pasture that lay along the property line with our neighbour. We chose a woven wire livestock fence, with 6-inch diameter round cedar posts and wire mesh that has smaller (rectangular) holes near the bottom and larger ones near the top. This 300-foot section ran over some uneven ground and, as it turned out, required the removal of a few small trees. We could never have done a proper job of this ourselves, not having any earthmoving equipment. The fencing guys arrived with a nifty little Bobcat – well, actually it’s the biggest Bobcat you can get, so we were told – and we were fully impressed with the strength and versatility of this little machine.

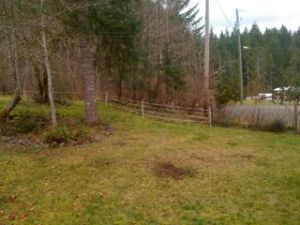
The first thing they did was create a path about 10 feet wide along the property boundary so they could properly sight the line. The fence would go about 4 – 6 inches inside this boundary so that it was “all ours”, legally speaking. Then they smoothed the grade a bit in preparation for the posts. Part of this process required them to fill in a low-lying boggy area. This was a bonus since they used a huge pile of wood debris sitting nearby that was leftover from when the utilities crews came by to clear the right-of-way several years ago. They used it to fill in the low-lying area, then topped it off with dirt and ran over it until it was pretty solid. What a difference! And it was nice to finally be able to reach the gate (which you can’t see in this photo – it’s beside the utility pole) without being ripped apart by nasty thorny bushes.

Ditto with the bottom short side of the pasture, another section that was full of thorny bushes, piles of logs and small poles, and really messy-looking. Hopefully the pigs will take care of the mess on the left side of the photo. We’ll get to the mess on the right when the budget next allows.

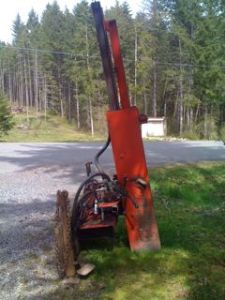
It was neat watching them put the posts in. I’ve done my fair share of digging in our rocky soil and I can tell you it is back-breaking work. Even a brand-new sharpened shovel will go in maybe 2 – 4 inches before hitting a rock. Hand-held post hole scoopers are useless and even hand-held powered augers don’t work – hit a big enough rock and the thing could throw you off your feet. We assumed the pros would use an auger mounted on a tractor, but our guys showed up with this nifty post-pounding attachment.

This made quick work of installing posts – no holes to be dug! – and allowed for the operator to adjust for level as the posts were going in. It was for this reason that we decided to have him install posts for us along the other three sides of the pig pasture: we got the posts at the contractor’s cost and it was only $5 more to have them pounded in.

As someone who has personal experience with digging in our rocky soil, this was as sweet a bargain as I could behold, and *definitely* worth the hours and hours of hard labour it would cost us to do it ourselves. It also looks much nicer than the cheap plastic posts we used for last year’s electric fence. To top it off, when the fence guy heard we would be running electric tape along the posts he suggested we double-space them. This cut the cost in half, it’s fully sufficient for electric tape fencing, and when we are ready to do a proper woven wire fence we merely need to put posts in-between and they’d all be the right distance apart. We really appreciated this advice.

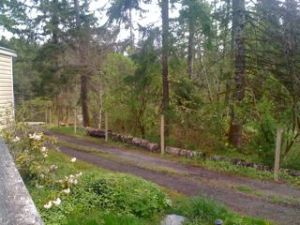
The top half of the pasture is almost a right triangle, with a very short top section joining the two long sides. The long side that isn’t on the property boundary follows the curve of our driveway. We chose this because we thought it would look nice to have fencing running alongside the driveway, but mostly because this required no clearing (other than moving aside the logs I so diligently rolled into place by hand last year!). It will allow the pigs access to the wooded area within, which we think will make them happy (pigs are forest creatures, after all). After following the driveway the line then continues alongside the “roadway” that leads down into the undeveloped part of the property and was rather loosely defined until the posts went up.


The total area of the pasture is approximately 1/2 acre, or around 20,000 square feet. There’s still some work to do clearing out the area: our fire pit will have to be moved, as will a large pile of firewood, and my compost bin and some other piles of wood debris (while we had the Bobcat here, we had him move one large pile for us). Husband will be stringing the electric wire some time soon and running a line to the garage for power.  Finally, the pig shelter we built last year is going to be moved uphill a ways and turned towards the southeast so they can get the early sun to warm them in the mornings. We’re going to replace the roof (which was recycled from an old greenhouse on the property) with a metal shed roof from which we will collect rainwater for the pigs to drink. They arrive in about 5 weeks so we’ll definitely be ready by then, and very much looking forward to having critters around again.

Fencing Progress

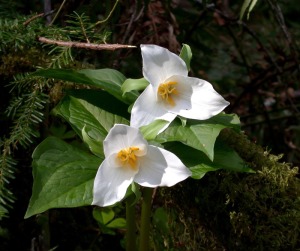
Spring is in full swing here on the farm. The WesternTrillium is in bloom, bringing brightness and beauty to the woods. Husband and I spent today running string between property markers to mark out fencelines. This is the first step in building a proper pasture for this year’s batch of piglets, who will be arriving next month (we’re doing 3 this year). The pasture will be approximately 400 x 50 feet, giving our pigs about a half-acre of land that is a mix of forest and open brush.

One long side of the pasture lies along the property line, dividing ours from the neighbour next door. She is donating the cedar fence posts and a roll of wire mesh for that part. We’ve decided to hire a guy to do this section, as it runs over uneven ground and we want it to look nice and be durable. The wire mesh gets attached at each end of the fence line to special braces that absorb the tension as the fence is tightened up. It will likely need braces midway as the terrain changes from downhill to uphill, too. Definitely not a job for newbies.

We’ll be watching and taking notes for future reference, however, as we hope to do the rest of the property ourselves when the budget allows. While the pig pasture will run along the first 350 feet or so of the property line, there’s another 400 feet to the bottom of the property. Today we went out with a 1000 ft roll of mason’s twine to see if we could mark the whole fence line.

About halfway down that side of the property somebody put up a farm gate many years back. It sits there looking rather strange – a gate all by itself without a fence. It does, however, have 4 posts that are in a straight line and the question was whether whoever built it ensured it was lying on the property line. If so it would make a very handy reference point. Our plan was to run a line of string from the topmost property pin to the gate (our property runs from North to South, so we designate North as “top” and South as “bottom”), then stand on the other end of the gate and eyeball the four posts to see if it matched the line of string.

So we did this and, as far as we can tell, the gate and its posts are in line with the property markers. Hooray! So using that as a midway point we continued running line from there down to the bottom property marker. We had always assumed there would be trees in the way and that we’d have to do some heavy tree removal before running a line there. To our delight we discovered that it’s a clear line all the way from the gate to the south property marker (we now suspect it may have been cleared for that purpose several years ago). That’s going to make it much easier, and less expensive, to fence when we’re ready to do so.

As for the other 3 sides of the pig paddock, we’re going to do those ourselves. We’ve laid it out so there are no trees in the way, and now the question is simply what sort of fencing we’re going to install on those sides. If we choose to use wooden posts (which look nice) we’ll need someone to dig the post holes since our very rocky ground precludes the use of hand-held power post-hole diggers (apparently if they hit a rock they’re liable to swing you right off your feet). We’re going to ask the fence guy if he would do that for us (presumably he has a tractor or other machine with an auger) and how much it would cost.

Originally I figured we’d just use metal T-posts as they go in the ground quite easily, being smaller and with a sharp point. However, T-posts are almost twice the cost of wooden fence posts, so if the difference is about the same price as getting someone to dig the holes for us, we may be just as well going for wooden posts. While T-posts are much less permanent, we’re pretty certain of where we’re placing the lines. With all that said, the budget is tight these days and we may end up settling for electric fencing along the 3 other sides of the pig pasture. It’s by far the cheapest option, and the easiest to install. It just doesn’t look as nice as proper farm fencing.

Spring Projects

I hope my last post didn’t seem too depressing. While the major cost projects are on hold for a while, many smaller projects are underway…

The most exciting is that we’re currently in talks with a permaculture design outfit and are expecting a proposal soon to do a Design Review for us. This means they, with their extensive knowledge of permaculture (I don’t want to reveal names yet, but they are top notch), will come for a site visit then go over our Site Plan to see how we can improve it, or if there are any glaring errors. I’m sure they’ll have much input there. The other thing they’ll do is provide us with a comprehensive list of plants that we can grow in our climate, including those that can provide food or other uses, and – importantly – how best to grow these plants in polycultures and guilds. By the end of this process we hope to have a Site Plan that includes all the plants we’ll grow here, where on the site they’ll be planted, and with what other plants in what groupings. From this point on it will simply be a matter of time and budget as we implement all the elements in our plan ourselves. It may take years but that’s okay with us. Having the detailed Site Plan is all we need to get started.

With respect to the trails project, that is continuing nicely. I’ve re-worked an old trail from last year, widening and clearing it a bit so it won’t get overgrown this summer. And I’ve added a whole new trail through a previously under-explored section of our woods. I’m thoroughly enjoying this work, as much as it exhausts me physically (though I confess the aching muscles bring a good amount of satisfaction for a day of work well done). I’ve been walking the trails pretty much every day, and will soon be bringing along a colinear hoe to keep the nettles on the paths at bay. There are a few more trails to blaze in order that our woods be broken down in more manageable plots. By manageable I mean small enough for us to really observe the nature of the site, what’s growing there, and the potentials for use. Even in a small woods like ours (about 2 acres) there are noticeable differences in terms of the characteristics of different spots in the woods. Some areas are already showing promise as clearings into which we can plant fruit tree guilds and other things that need sunlight. Other areas have a denser canopy, and there are definite differences in moisture too. Building trails helps us to break the woods up into smaller areas that we can study in more detail. Plus, it’s just lovely to walk amongst one’s own trails!

Finally, a brief project that I finished over the weekend is fencing the “back yard” (which is actually the front yard, but we don’t use it for much) for the dog. I used materials we had lying around, so it’s a combination of plastic-mesh netting held up with a few metal T-posts interspersed with alder logs that I cut into post lengths and buried as deep as I could easily dig. The other half of the fencing is electric fence from our pig paddock last year. The dog got zapped back then and wouldn’t go near it after that. I was hoping she’d have the same respect this time around. When all was done, we tested her by throwing a stick around that “accidentally” went over the electric fence. Well, she jumped right through a gap in the wires and didn’t appear to get shocked at all. So I added another round of wire (it’s actually electric tape, which is thick, flat, and white) to reduce the gaps between lines. She hasn’t tried to go through it since, but she hasn’t had the ultimate test (a strange dog walking past our house, or a squirrel on the other side of the fence), so I don’t know if this is truly going to deter her. I’m hoping with the lines closer together, any attempts to break through will result in enough of a slow-down to receive a good zap. I hope it will be enough. Meanwhile, I thought this fence would look really ugly but it actually isn’t too bad. Sometimes you have to choose between Pretty and Affordable. This time Affordable wasn’t too bad.

First Project of 2011: forest trails

The weather is starting to warm up and spring is definitely in the air. I’ve seen crocuses coming up and the snowdrops are blooming everywhere. One fine day recently I got a hankering to head out and get started on some farm projects.

The first project I chose was time-sensitive, but had the added appeal of costing us nothing. I decided to get to work on creating a trail network through our woods, which compromise the bottom half (2 acres) of our property.

When we moved here last year (it’s been a year, woo-hoo!) we enjoyed walking through the woods using some deer trails. We didn’t know that, come summer, the woods would become impassible due to heavy understory growth, including tall stinging nettles and thick, thorny vines. I was determined not to have the same thing happen this year around, which was one reason to get to work on the trails.

The other reason has to do with our site design plan. Right now the woods appear as an amorphous mass of trees and shrubbery. It’s hard to get a feel for the different micro-regions within the woods, to map out where certain trees and plants are growing and where clearings exist. It is my hope that, by creating a trail network, I can mentally break the woods down into sections to make plant inventory easier, not to mention assist with adding some details to the lower half of our site plan.

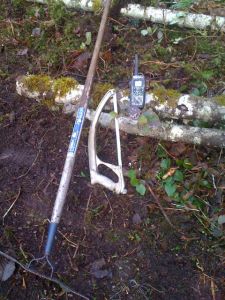
The picture at the top of this post shows the tools I brought with me. The metal rake was used to sweep a path that could be clearly seen amongst the deep leaf litter and scattered branches. The hacksaw was used to cut away trees and branches that got in the way. I really enjoy using the hacksaw – it cuts through trees up to 2 inches in diameter with little effort and in quick time. It’s much easier to cart around than my chainsaw, makes far less noise, doesn’t require me to sweat buckets just to get it started, and I don’t end up swearing when the motor dies unexpectedly (yes, it’s a cheap chainsaw). Most of all, I don’t have to put up with the racket! Being in the woods is a peaceful experience for me, and a chainsaw kinda ruins that vibe. The final tool was my walkie-talkie so that the kids (who remained in the house) could stay in contact with me.

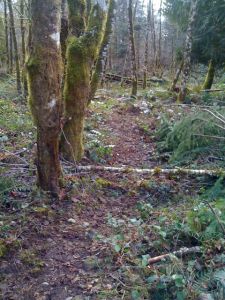
I started on the main trail that we use most often, and the work went quickly. I was fascinated by the root system of the stinging nettles I pulled up from the path; it was like a giant web running under the soil, and explained why the nettles have spread so thickly through our woods. I don’t want to get rid of them altogether as they are not only edible but fix nitrogen, thus providing a valuable service to building up the soil. But having them on the trail, or right along the edge, makes for an unpleasant walk in the heat of summer when covering up in protective clothing is not a desirable option. Here are the before and after pictures of a section of this trail.

A couple days later I went to work on establishing a new trail in another section of the woods. This process involved looking around for obvious paths that would require the least amount of clearing, using the rake to define the path, pulling up any salal, dull oregon grape, grass clumps, or nettles that were growing in the path, and sawing off any branches that hung in the way. This work went surprisingly fast as well, and I soon had a loop circuit that connected with a trail I made last year at the bottom of the property, as well as branching off to another part of the woods where I’ll start next time.

I really enjoyed the work, and will almost certainly enjoy the maintenance. That’s because the best thing you can do to maintain trails is walk them! The dog and I make a circuit on every walk now, and I can’t tell you how neat it feels to have my own forest trails. Walking through a forest is one of my favourite outdoor things to do, and now I can do it without even leaving home!

Permaculture Site Plan: 1st Draft

I’ve been very busy these past few weeks: on any given sunny day, and on several slightly rainy ones, I could be found outside with my 100 ft tape measure, a stake and a mallet, and a sheaf of paper (sometimes wrapped in a clear plastic bag). I was using triangulation to create an accurate map of our property and the major features on it: driveway, house, shed, etc. It took me a few days to get all the measurements, and parts were tricky. In order to use triangulation to locate a specific object in space you must start with two known points that, together with the object, form a triangle. Our property is large and does not contain many two-point features, so often I had to work my way out to a desired object, by locating two trees I could use, or even by planting stakes in the ground.

The result of all this hard work (and a bit of fun with a compass and square-ruler that took me back to grade-school geometry class) was this:

This shows the complete North boundary (North is Up), and the east and west boundaries. The southern boundary is not shown, as it lies way down the page. What you see is approximately half the true length of our property. The Northern boundary lies some distance from our street, which runs west to east, ending at a dead end about halfway along the length of our northern boundary. East from there one enters the forest through a hiking trail. So while it looks as though the house is practically on the street edge, in fact we have a fair amount of yard that extends northwards past the true property boundary to the street.

The dotted lines show the Right of Way (ROW) for the local utility company. A pair of residential power lines runs through this corridor (the poles are not on our property) and there are restrictions on building within this area.

Our driveway begins in the northeast corner and wraps around the house so that the area marked by solid lines including the house, garage, and shed is all gravel save for the tear-drop shaped garden area in front of the deck. This area, enclosed by the solid lines, is flat, having been dug into a hillside. Thus the shaded area behind the garage and part of the house, which is a steep grade of earth that rises abruptly to the high point on our property – the northwest corner. Standing at the northwest corner of the garage the earth rises about 8 feet almost straight up, but quickly comes down as one walks southwards, so that at the site of the shed the land is only a couple of feet higher than the grade around the buildings.

The roadway that extends downwards from the main living area is, as of right now, dirt and rather loosely defined. It wanders southwards until, within the ROW it turns to the west and leads out of the property through a gate, and into the forest next door.

Using this map I was able to play with siting our future cob house. I cut out a square whose dimensions corresponded to 33 x 60 ‘ (2000 sq ft) and moved it around to see where it would fit. I wanted the parking area to be north of the house so that the southern views were not marred by cars, which also renders the south yard area quite unusable. I wanted to avoid doing any more grading and earth moving if possible (I hate the fact that they dug into the hillside in the first place: it looks like a wound on the earth having that great wall of earth rising up behind the buildings). And we could not have the building anywhere within the ROW. Since there is a neighbour to the east with a house close to the property boundary we wanted to avoid building along the east side. I eventually settled on a site for the future house, though mostly for the purposes of moving forward with the design process: I’m not certain this is where it will end up, but it gave us a starting place.

It then took some time and many false starts to finally come up with a plan for how to divide up the property into the various Zones of permaculture.

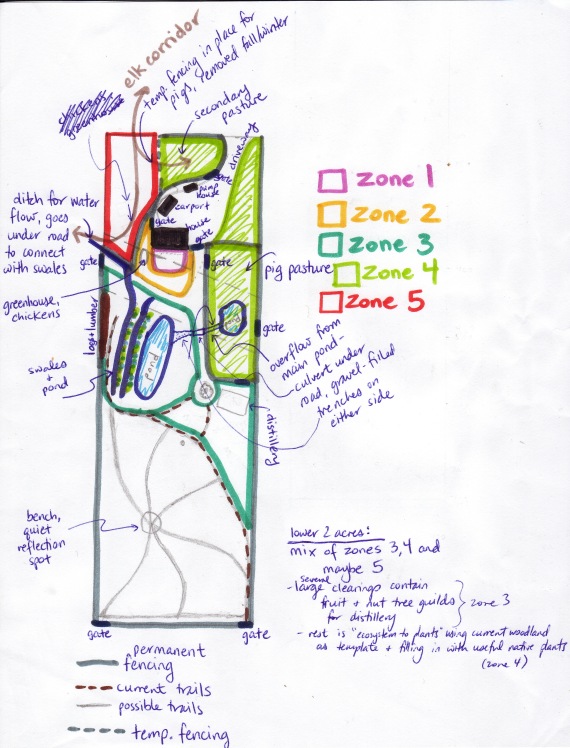
This map is almost the entire property; it should actually extend a bit further down but I decided not to be accurate there for the sake of having a manageable paper size. The living area shows the future house (largest black rectangle). Zone 1 is outlined in pink and will contain the kitchen garden, patio and other outdoor living areas. Zone 2 is outlined in yellow and will include more kitchen garden plants, including some dwarf fruit trees and berries, a greenhouse, chicken coop, greywater ponds, rainwater harvesting barrels and cisterns.

Zone 3 will contain most of our polyculture guilds: fruit and nut trees around which guilds are built. These will form our Food Forest. It also contains a spot for drying out logs and milled lumber (brown area on west side). Finally, this Zone contains our water harvesting system, which I’ll now describe in detail.

When it rains, a small stream forms that runs into our property through the West Gate. This is water that comes out of the forest and collects along the power line roadway (which forms a natural ditch that directs water onto our site). A substantial amount of water flows through here during the wet season and we wish to capture and store it and use it to our advantage. So the dark blue line starting at the West gate shows my idea for digging a proper ditch that would then have to run under the road (a simple culvert would do) to get to our Zone 3. This ditch would feed into a system of swales – ditches that run on contour, on the downward side of which are mounds of earth (berms) that are planted with polyculture guilds. The swales capture the water, spread it out over a long stretch, where it slowly sinks into the berms and irrigates the plantings on the berms. Each swale has an overflow area that feeds into the swale below. I’ve only drawn two swales here but probably we have room for 3 or more (this area slopes rather steeply to where I’ve drawn the larger pond). The final swale feeds into the pond. Right now this area is a seasonal “giant puddle” that is overgrown with salmonberry bushes. We’d like to dig it deeper and turn it into a true pond, create a wetland garden around it, and figure out how to make it less permeable so it holds the water year-round. This area will then be home to some geese and ducks, who will do double-duty providing eggs and meat as well as patrolling the food forest for slugs. There will be an overflow for the large pond – a gravel-filled trench, that will lead eastwards under the roadway (culvert) to a smaller, secondary pond. This is currently another seasonal “large puddle” where salmonberries abound. We may try to fix it so it is still wet when the pigs are here, providing them with a place to cool off. But the main source of water for the pigs will be a rainwater harvesting system on the distillery building.

The “roundabout”-looking thing in Zone 3 is a large bigleaf maple tree that sits atop a hill, near the centre. We plan to extend the dirt road and make it go around the tree. From this point southwards the property is all woodland. The brown dotted lines are current trails through the forest. The future Distillery building will go east of the maple tree; an area will be cleared to the south of the building to allow solar access, and within that part of Zone 3 will be more fruit and nut guilds with which my husband hopes to create some interesting spirits.

The light green areas are Zone 4, which can be divided into 3 sections. The first lies along the east side of the driveway and is currently full of trees and shrubs. We’re going to leave this as is for now, as it provides a nice privacy screen to the neighbour’s house. South of that area is a roughly 1/4 acre pasture which will house our pigs each spring/summer. We’re hoping there is enough land in there for them to graze without completely digging up the place, but if necessary we can divide it up into 2 or 3 sections and rotate them through it. The third section of Zone 4 is north of the house. This will be a reserve grazing area for the pigs should the other pasture not be sufficient in size to prevent them overgrazing it.

The grey lines show where we plan to install permanent fencing. The entire area from the house to at least the southern edge of Zone 3 will be perimeter fenced so that deer and elk cannot get into the food forests (I’ve shown it extending around the entire southern half of our property, but am no longer sure if we need to do that). However, I wanted to include in our plans a way for the local elk herd to continue visiting our property. It has been such a wonderful and meaningful experience to wake up to the sight of these gorgeous animals grazing so close to our house, and I wanted to include them in our design plan. So you’ll note that, in the northern section of Zone 4, the permanent fencing ends about halfway along the northern boundary as you approach from east to west. This is so we can leave it open when not in use by the pigs. The elk have been accessing the property through the northwest corner (which is forested) and grazing along the western strip of pasture, then leaving through the West Gate. So by leaving that part unfenced we retain their access. The bit of permanent fencing can easily be closed off by running a short length of temporary fencing (dotted grey lines) for when the pigs need to use it. Removing the temporary fence will open up that part to the elk when the pigs are not using it. Thus, the area in red denotes Zone 5: the wild, untouched zone.

This leaves the bottom 2 acres below Zone 3 to design. I scribbled some notes in there, but have since changed my mind. In wandering through the woodland this winter I’ve fallen in love with it again and am increasingly distressed at the thought of disturbing it much further. I’m hoping that the area already set aside for Zone 3 will provide enough fruit and nut trees to keep my husband happy. Then I could leave the rest as is, though I have some ideas to experiment with what is called “ecosystem to plants” design, basically starting with the current woodland as a template and adding or replacing certain other plants to increase ecosystem health, restore at-risk native species, or just experiment with new polyculture blends. I’ll talk more of this in a future post about my upcoming farm project, which involves this area. For now, I’m hoping to leave this area “as is” and see what we can do with it while preserving its unique beauty.

Well, if you’ve followed me thus far I hope I’ve kept you interested. The process of permaculture design is fascinating to me and I’ve really enjoyed the process so far.

The Joy of Pin-Finding

In my last post I talked about how we are planning to design our farm according to permaculture principles. Part of the design process entails creating a detailed, accurate “to-scale” map of our property. In order to do this the first thing we needed to do was map the property boundaries.

Ever since we moved here I’ve been trying to locate the various property markers around our site. The fact is, when we bought the place we didn’t really know what lay at the bottom half of the property. Of course we had a schematic diagram and we knew the size and general shape of the place, but being totally unfamiliar with the area we really didn’t know much else. The first couple of months here was a process of discovery as we ventured into the woods at the bottom 2 acres and discovered a charming woodland and the fabulous discovery that it bordered a section of the Trans Canada Trail. It was like Christmas here for a while in February and March (until the woodland understory exploded with growth and we could no longer walk through it!). We had a much better idea of where our boundaries were by this point, but still nothing too accurate.

We had a map showing where our property markers were supposed to be, but as anybody who has attempted this will tell you, it’s not always so easy to translate that to finding them on the ground. Property markers are iron stakes that may have been in the ground for 50 to 100 years depending on the age of the property. In that time they get overgrown with trees and shrubs, buried in soil, and essentially lost. So whenever I’ve had some spare time I’ve taken to hunting them down. I was only able to find one of the four corner markers, and in total I’ve probably racked up a few hours trying to find the others. It became somewhat of an obsession for me. What can I say? I’m one of those gals who digs maps, spreadsheets, and other geeky stuff like that.

Well today was a lovely sunny day, temps were not too cold (around 4 C, which made me feel bad for those easterners braving the winter storms right now), so I decided to head to the local tool rental place and get myself a Pin Detector. This is essentially a metal detector that is designed to find property markers. I was hopeful that it would help determine whether, in fact, our markers were even still there (they get lost despite it being illegal to remove them, and it costs a lot to have them replaced).

It took me all of 15 seconds to find the first one, in the northeast corner. I’d already found the wooden marker, which had rotted and been moved around by animals, and some flagging tape that was just the right size to have been wrapped around a pin. I’d gone over that area with a metal rake pretty thoroughly, and had to laugh when the pin detector started whining in a spot I’d gone over before. Just dumb luck my rake had missed it, buried only a 1/4 inch or so below the surface. I pounded in a piece of rebar and wrapped tape around it, then moved on to the most difficult site, the northwest corner.

This area was covered with salal, as well as heavy layers of fallen branches, rotten wood, and vine-y ground cover. It is the edge of a Douglas Fir forest, and the ground cover consists of dense, woody mulch and lots of thick shrubbery. It took me about 20 minutes to find the pin, resting in a hollow between fallen tree branches, and buried beneath about 2 or 3 inches of debris and soil. It took so long because I had no specific idea of where it might be (no wooden stake had been found). I’d eventually gone across the path to the neighbour’s pin, which I knew lay directly north of ours. With that as my guide I was able to stay on course and find our pin. I pounded in a tall stake and flagged that, so pleased that now we could draw a boundary line across the top of our property (the north border).

The final pin to find was the southwest corner marker (the southeast pin being the only one whose white wooden marker post was still intact and in place). I’d already been exploring heavily here. It’s a rather fascinating place: as I learned recently this area was home to a huge logging operation in the 1910’s and 1920’s. There are various old bottles and steel pans to be found in the woods at the bottom of our property, which borders what used to be the railway that carried the timber to market (it’s now part of the Trans Canada Trail). Remains of the old fence that bounded the northern side of the railroad can still be seen at the bottom of our property: some fence posts still stand, most have fallen over, the rusted mesh wiring still there. Anyways, I’d spent a long time down there raking aside the salal and shrubs in the general vicinity of where the pin should be, breaking back dead limbs and clearing a path wide enough to walk along. I thought I’d done a pretty good coverage of the area looking for the pin (as with the northeast corner of our property, I’d found the rotted wooden pin marker and some scattered flagging tape remnants). With the pin detector t took me about 5 seconds to locate the pin, which was buried about 2 inches below solid soil, upon which lay some twigs and a few small growing shrubs.

We now have a complete rectangle that defines our property. On the next sunny weekend Husband and I will venture out with twine and connect the corners to get a good idea of where the boundaries lie. This won’t be so easy since the long side of our property is several hundred feet. Nevertheless, we’ll give it our best shot (and we do have a couple of landmarks along the long sides we can use to help line things up). Then I can start the site mapping process, using triangulation and line extension methods to measure distances between objects, all with reference to the property markers. This may sound like a lot of work, and it will be, but I can’t tell you how much I love this sort of thing so for me it will be a very exciting process. I think visually, and to have a scale map of our place will set me to endless joyous hours planning what should go where.

So the moral of the story is, while hunting around in the bushes for pin markers may be fun, save yourself thousands of dollars in surveyors fees and go rent a pin detector. It’s kind of like treasure hunting, and if you discover a pin missing you can play ignorant (unlike the surveyors, who told me it could add significantly to their $2000 estimate to survey our 4 acres if a pin was found to be missing, as they would be obligated by law to replace it).

A Farm by Design

When we moved to this property in late February, what we found were four acres of land that had not been tended to in many years. Dense woodland covered most of the property, but it was not what I would consider a healthy forest. It hadn’t been managed well. In summer we found that the rampant stinging nettles (they grow over 5 feet tall) and thick stands of thorny bushes prevented us from even walking through that part of the property. Several of the trees were dead or dying, saplings were spindly and not thriving well. I’m sure given a few more decades Nature would fully reclaim these woods and turn it into a healthy, balanced ecosystem. But in the meantime we were faced with land that was basically useless to us.

Our initial idea was pretty simple: we’d clear most of the land, leaving a handful of mature maples and cedars, and turn it into pasture. We wanted to open up the southern exposure to bring in sunlight, views, and provide us with a place to grow food or have animals, or just enjoy the lovely sight of “fields and fencelines”. We started by clearing a section of land on the northwest part of the property, beside the house, to bring some much-needed direct sunlight to the house, and to visually open up the space around us. Summer brought an end to land-clearing work as the heat made it uncomfortable to wear proper protection, and the explosion of plant growth tripled the work involved. Our plan was to get going with more land-clearing when fall arrived, but I spent that time digging my new vegetable garden. With Spring not far away (it comes early here) it’s time to decide what projects will be tackled first, and how best to go about them.

I admit that there are some things about having wooded property that I don’t like. I crave light (living in a north-facing apartment a few years ago really depressed me) and I like open views. While I absolutely love the forest, and spend as much time in it as I can, I don’t want to live in the middle of one. Part of me was really looking forward to clearing the bottom acres so that we could have more sunlight and a lovely view of the valley below us. But then again, part of me was feeling a bit conflicted about ripping up this woodland. Healthy and useable or not, it is home to many lovely birds and I can see various habitats within it: seasonal small ponds, rotting logs that provide food and shelter for wildlife, dense leaf-fall that enriches the soil. We do have 160 acres of forest right next door to us, but it is a different kind of woodland, not the young transitory wood that we have onsite filled with alder, maples, and few evergreens.

Last week, Husband and I watched a BBC documentary called A Farm for the Future. In it, filmmaker Rebecca Hosking ponders the future of her family’s small Devon farm (UK) in the context of a world where fossil fuels may no longer be cheap and easy to come by. As she looks for solutions she stumbles upon the concept of permaculture and, skeptical at first, goes about interviewing and visiting with farmers who are putting the principles of permaculture into action to produce sustainable small farms from which they can make a living. This movie seemed to really resonate with my dear Husband, and I eagerly agreed to join him in further exploring permaculture as a design strategy for our own homestead.

While I was familiar with the word “permaculture” I didn’t really understand what it meant. I had picked up a gardening book some time ago, and all I’d gotten from it was a system of designing gardens around trees. I didn’t see the point, and I didn’t see the relevance to our situation. This movie made me realize that permaculture is much more than gardening, it’s basically an idea and a set of principles that one then uses to design systems based on one’s own unique situation. One concept that really appealed to Husband was the idea of a Forest Farm. It’s essentially a managed woodland in which edible plants are mixed in with other plant species that provide different roles: soil nourishers, nitrogen fixers, shade providers, leaf (mulch) providers, structural elements, medicinal plants, etc. In short, it was a whole new way to grow food: instead of using plots and rows and isolating the veggie patch from the rest of the property, these veggies (and fruits and nuts and herbs…) were integrated into the whole system, spread throughout the property based on their unique inputs, needs, and outputs. In this way one small property can have a lovely little forested woodland, open spaces for pasture animals, and beautiful garden spaces with all these systems working together.

For me, the immediate appeal of this idea was realizing that we didn’t have to tear down our woodland, reduce it to only a few trees, in order to enjoy our property. Permaculture could give us a system for designing our property so that we can have the things we want (some open spaces, sunlight, pasture for animals) without having to fight against Nature (weeding, tilling, drilling new wells or running miles of pipes underground) or destroying what we already have (which, while not useful at this point in time, nevertheless has taken several decades to get where it is today). So I very enthusiastically agreed with Husband to pursue the topic further, to learn everything we can about permaculture, and use that knowledge to design a homestead where all elements work together (water harvesting and flow through the land, animals, plants, wildlife).

We’ve only just begun to scratch the surface, watching all the permaculture movies we can get our hands on, ordering books from the library, etc. Our immediate goal is to create a design for our farm, a detailed site map of what we want this place to ultimately look like, and all the projects that will require. Only then can we set out on a lovely winter day, tools in hand, dog at our side, to wander over our land and perform the work necessary to achieve those goals, one step at a time. It’s likely that we will end up hiring a consultant to aid us in the design process, as there is just so much to learn and understand about all the systems involved (gardening, microclimates, water flow, greywater recycling, plant selection, plant grouping, etc). But before we do that we’re going to educate ourselves as much as possible so we can participate as much as possible in the design process. Hopefully, we will end up with a detailed site plan and a list of all projects necessary to complete the plan. It won’t all happen at once, and that is very okay. We’ll take each project as it comes, as budgets and time allow. I’m excited that we have found an approach to farm design that fits in with our values. And I’m even more excited that implementing the plan will be a process, a journey, one that cannot be rushed, one that can be enjoyed in stages. I can’t wait to see what our final plan will look like; in the meantime I’m creating a lot of lists!

Milling our Logs

Having realized in a recent post that I had neglected to write about our log milling experience, I’m catching up with this post today.

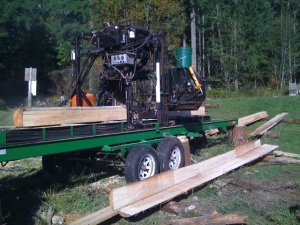
Back in April we cleared a small section of land on our property. This left us with two large piles of logs, one of which were those deemed straight enough to be milled into lumber. It wasn’t until fall that we got around to having it milled; we didn’t want the stuff to rot over winter (winters are very wet here) and see it all go to waste. Most of the logs were Douglas Fir, which grow like weeds around here and are apparently the best wood for stick-framing, with a handful of Amabalis Fir and Western Redcedar thrown in. Here’s a picture of the log pile not long after they started:

We used the same tree service company that had originally cut these logs: we like the owner and, importantly, we trust him. He sent over two of his guys with a small Bobcat (with a fork on the front to lift and move the logs to the sawmill) and a portable sawmill (it’s bascially on a long, flatbed trailer, thus the “portable” aspect). I’d never seen a sawmill before and it wasn’t what I’d imagined. Instead of feeding logs through a saw, the saw parts travel along the length of the machine. There are spikey bits that poke up from underneath to turn the logs around as they are being cut, and to hold them in place. It was quite fun to watch, and obviously required some skill to use properly.

Because at the time we weren’t sure what exactly we’d be building, we had them cut us a variety of lumber sizes. We asked for 2×6’s, 2×4’s, and 6×6’s. It took the guys about 2 and a half days to mill our pile of logs (plus they managed to pull a couple out of the firewood pile that turned out to be usable). We paid about half of what we would pay to buy the lumber at the local big box hardware store, plus we had the satisfaction of knowing the wood came from trees grown right here on our land.

We’re planning to use the wood for a new barn we’ll be building this Spring (if all goes as planned). Meanwhile the piles of wood, which are raised off the ground and have spacers separating the stack levels, are sitting under giant tarps weighed down with rocks. I’m looking forward to seeing them put to good use!

DIY Soil Test

I’m pretty new to this whole gardening thing, but I already knowthat there are different kinds of soil and they get treated differently by gardeners depending on their type. In my new gardening Bible, Growing Vegetables West of the Cascades, the author describes a very simple test that one can perform to determine what kind of soil you’ve got. I did this test yesterday and was surprised, and pleased, by the results.

Our first opportunity to take a good look at the soil around us was when we cleared land for our new pasture and had to rake it before seeding. I noticed variations in the composition of the soil as I moved around the area. While we are overloaded with rocks (thanks to the glaciers that shaped this land during the last ice age) I could still tell that some parts were thicker and softer than others, and some areas had way more insect life than others lurking under the surface. When we were looking for temporary spots for growing Husband’s heritage wheat and corn test plots, as well as a place to put the heirloom tomato transplants we’d picked up on a whim from a local organic farm, we chose sections of the new field that we knew had thicker, richer soil. However, it still didn’t look like the dark, rich loam that you get out of bags from the garden centre, and I wondered exactly what we had here.

Now that I’ve decided where my garden plot will be next year I’ve been reading more seriously in preparation for digging up my beds this fall. I had become quite convinced that we had clay soil because I’d seen it clump up, I’d seen it retaining water and puddling, and I’d seen it form a crust over the surface. Just goes to show you that a little knowledge can be a dangerous thing, or at least send you off in the wrong direction. Thankfully, I am an optimist and wanted to make doubly sure that I wasn’t going to have to deal with this, the most troublesome of soils. So I did the soil test.

You take about a half-litre of dry soil, remove as much organic matter as you can (leaves, twigs, etc) and rocks/pebbles, then crush it up as finely as you can. You put the dry soil in a 1-litre glass jar and mark a line on the jar where the top of the soil is. You then fill up the jar with water to about 1/2 inch below the top, add a few drops of low-sudsing dish detergent (natural or eco-friendly brands are low-sudsing), put the lid on and shake vigorously until it’s thoroughly mixed up. Put down the jar and exactly two minutes later mark a line where the first bits have settled out. Exactly two hours later mark another such line, and then two days later mark the final line. These will represent the fractions of sand, silt, and clay in your soil. The proportions of each together will allow you to identify your soil.

As you can see from the photo at the top, our sand fraction (line 1) is about 1/3 of the total soil volume (top line) and silt (line 2) makes up about 1/2 the volume. The clay still hasn’t settled out although it won’t be two days until tomorrow. Still, based on what has settled out over the last 24 hours I’m guessing it will take a lot longer (Solomon says that it could take up to a month for that fraction to settle if it’s very fine). Nevertheless, I already have enough information to go on.

I wasn’t too sure about the sand part because the water was so murky it was hard to tell what had settled and what hadn’t. I just gently wiggled the jar and drew the line between the part that swished with the movement and the part that didn’t. How’s that for scientific? You can see a line of demarcation between lines 1 and 2 in the photo, and I wondered if maybe I’d marked line 1 incorrectly. However, even if the true location of line 1 is where that demarcation is it doesn’t change the results that much. Sandy soils are defined as being more than 70% sand (according to Solomon) and that demarcation is around 50%. The good news is that the clay fraction is definitely less than 1/3 of the total soil volume, which means we don’t have Clay Soil.

What we have is Loam, classified as soils with mostly sand and silt and less than 1/3 clay. Ours trends towards Silty Soil due to the large silt fraction relative to sand, although if I’m mistaken about the true location of line 1 then it trends towards loam or sandy loam. Either way we are dealing with good news. When I read the section on Fine Loam and Silt Soil (page 66 if you have the book) the description of these soils fit ours to a tee which further convinced me of the validity of the results: soils with greater density due to the clay being fine, with smaller pore spaces and thus slower drainage; they also tend to form surface crusts and contain enough clay to form clods easily if tilled up when wet. The good news is they tend to be more fertile than other types of soil. The challenges with this type of soil is the surface crust which can be managed by adding thin layers of compost and only working it in the top layer (my new colinear Rogue Hoe, which I will write about soon, makes this a breeze, not to mention every time I weed with it I will be breaking up that surface crust) and by regular green manuring which I plan to do anyway (this means planting a cover crop any time the bed it not in use and tilling/mulching it into the soil when done).

While my gardening book is specific to the Pacific Northwest region of North America this soil test can be done by anybody and his explanations of the different soil types and their challenges would also apply. I also found this handy diagram for determining soil type based on your fractions:

When you use this diagram don’t make the mistake I made and eyeball your lines vertically (I’m used to reading graphs with vertical axes; note that the left and right axes on this diagram are angled). Follow the angled lines. So for example, if I was correct with my soil test and I have about 30% sand, 50% silt and 20% clay then I can start at the 30% mark on the bottom axis (sand) but as I follow it upwards I am moving to the left. I stop where it intersects with the line that angles to the right and ends at the 50 on the right axis (silt). I end up right on the border between Loam and Silt Loam. On the other hand, if I was inaccurate and I actually have close to 50% sand and 30% silt I end up in the right corner of the Loam section. Either way I have loam, not clay, and that makes me a happy camper!